How to create and deploy Tornado to Azure
In this article, I will show you how to create and deploy your first Tornado application in Azure. If you are using Flask, I recommend you follow this tutorial instead. First, lets address why Tornado? Well it is a Python web framework and asynchronous network library, and can scale up to tens of thousand open connections! Tornado works really well for web sockets applications, but also REST APIs. We will use an Azure App Service, that will provide a scalable solutions to any small to medium size project.
Step 1: setup your Tornado app
We will create a minimal Tornado app, with routes, that will easily deployed to Azure.
First we will create a file and name it “app.py”, this is our application entry point:
Then we will create your local environment and set it up.
Finally we will test locally, but running the following command on your tornado project directory: python .\app.py

Navigate to http://localhost:8000/ to check on the site, and try the following as well: http://localhost:8000/api/status, http://localhost:8000/api/tornado, and http://localhost:8000/api/tornado/a/b/c


Step 2: Setup Azure
First you will need an Azure account, if you don’t have one go ahead and create a free account first. Then we will proceed to configure the service via the Azure portal. We will not be discussing the Azure Cloud Shell as it is not always an option to have admin rights to install it.
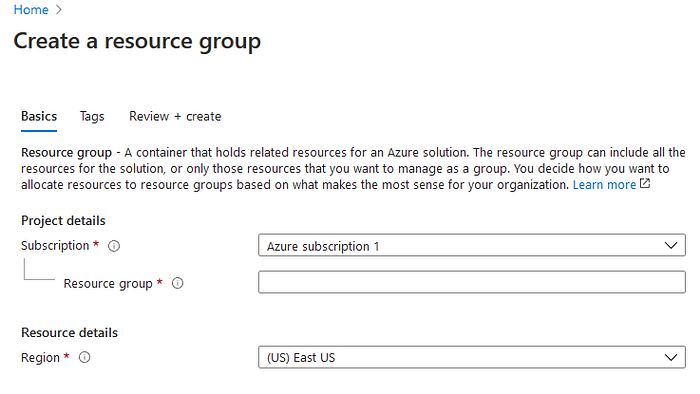
Create Resource Group
First we will use the option to create a resource group as shown in the image below. We associate all of our tiers within one in order to deploy and manage.

Then we will create the resource group, by selecting the subscription, assigning a name to the resource group, and finally selecting a region. Make sure that your resource group and everything associated with it is located in the same region in order to improve performance.
Create Web Application
Once you have a resource group, you can go ahead and create your web application.

Once you are in the create web app interface on the Azure portal you have to make sure to do the following:
- This will associate your web application with a subscription and resource group
- The name of your web application, which will be used as part of the address, http://<Web App name>.azurewebsites.net
- The run time stack that we will be using is Python 3+, we are targeting 3.8 (but you can use an earlier version of Python 3).
- Finally the region, it should be the same as your resource and anything else you want in your resource group (such as a database and such). Also the region affects pricing, and those vary depending on resource type and region! (it is a nice got chat moment)
P.S. Azure uses gunicorn on its App Services, because of that we need to use a version of Tornado that is less than 6.0. As an alternative to this issue in Azure, creating an Ubuntu VM would skip the gunicorn issue.

Test
At this point we need to test to make sure the web application we created is working. To do so, go to the following url on your browser (replace the <Web App Name> with your web application name:
https://<Web App Name>.azurewebsites.net
Another mention on this is, we always test, as a rule get used to testing after adding a feature or making changes test, if it does not work, fix it, test again, then moved to the next feature.
Configure For Tornado
The last step was to make sure tornado is setup to work with gunicorn for the WSGI environment in the Azure App Service by using the command “gunicorn -k tornado app:app”. However, you DO NOT need to do this anymore as you can just use the “python app.py” startup command instead to launch your Tornado server on startup. To do this go to the Settings > configuration panel on your App Service and change the Startup Command as shown below:


At this point you have a working local tornado application and the app service setup properly and ready for deployment.
Step 3: Deploy to Azure
Deployment is fairly straight forward, especially since you should by know now about git and how to use it. This will not go over git, but will set you in the right track to deploy.
First go to your new project from the dash board once it has been created, then select the Deployment center from the left navigation

Once you are there, you have a the git link, however you need to click on the Deployment Credentials right most button on the tool bar and will slide in a window from the right.
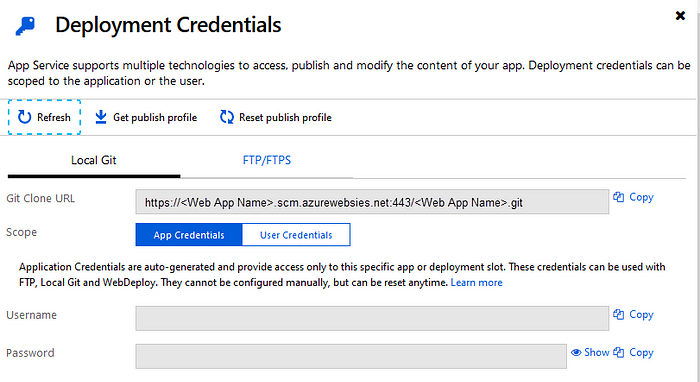
The window will contain the git account, username, and password. The best option is to use the information from the credentials window and follow these steps, but the punch line is in the image below:

At this point you should have your tornado application running without any issues. The main key points here is to have your startup command point to your tornado application. If something was not explained thoroughly or did not work do leave a comment or send me a message. Hope this helped!
Related Tutorials
How To: Use the Queries Library with Tornado in Python
How to: Implement an access token authentication with Tornado and PyJWT
Reference
https://github.com/benoitc/gunicorn/tree/master/examples/frameworks
